So, you didn�t exactly get your Christmas shopping done early this year. In fact, it�s Christmas Eve, and you haven�t started yet. Well, you�re in luck, because there�s such a thing as this homemade instant hot chocolate mix. We really shouldn�t be rewarding you for procrastinating, but that�s exactly what we are doing here.
Not only is this stuff way better tasting, and contains no �how do you pronounce that?� ingredients, but it also takes just seconds to make, and you may already have everything you need in the pantry. Just make sure one of those things is a very high quality cocoa powder.
I�m linking to the same exact Dutch-processed �cocoa rouge" that I used here, so that you can get all the particulars, and hopefully find something very similar. The better the cocoa, the better the hot chocolate. Or is it hot cocoa? Either way.
By the way, this will be the last video of the year, and we�ll be taking a little break until the New Year. Whether it includes homemade hot chocolate or not, I want to wish you and yours a very Merry Christmas, and Happy New Year! And, as always, enjoy!
I�ve never been a big eggnog person, and that�s putting it kindly. It�s too thick, too sweet, and way too artificially nutmegy. I even did an anti-nog tweet recently, just for a few cheap, seasonal laughs, but then I realized I was being unfair to this iconic Christmas drink.
I was basing most of my hating on the stuff in the carton from the supermarket, which features no booze, and a nutrition label you seriously don�t want to read. The homemade stuff I�ve had was significantly better, and so I decided to film this rather easy process, since I get so many requests this time of year.
This recipe does feature raw egg whites, so there�s a very, very tiny chance of a foodborne illness. If you�re concerned, please feel free to use pasteurized eggs, or Google, �how to safely use raw eggs,� or just make something else.
Freshness is the key here. The freshest eggs, milk, and cream you can get, and don�t even think about using pre-ground nutmeg. Maybe this recipe will be the one that finally has you going out to buy that jar of whole nutmeg and grater, but it really is the key. I hope you give this luscious liquid custard a try soon. Enjoy!
What these sausage cheese balls lack in sophistication, they more than make up for with their taste, simplicity, and proven track record for making party-goers happy. No one goes to a holiday party thinking, �I hope they serve sausage cheese balls,� but they all leave very grateful you did.
I�m not sure how these evolved into a Christmas snack, but I bet it has something to do with the fact you can stretch a few pounds of meat and cheese into enough finger food for a large crowd. They can also be made ahead, which helps in the old holiday time management department.
This is a recipe where everyone uses the same basic ingredients, but in wildly different proportions. Look online, and you�ll see versions with half the amount of biscuit mix, as well as ones with three times as much. It all depends on how bready verses cheesy/meaty you want your balls to be.
The bad news is, the only way to figure out your ideal formula is to test multiple versions. This is also the good news. Speaking of formulas, this originally calls for biscuit mix (like Bisquick), but I prefer to use self-rising flour. Besides some added fat, that�s all biscuit mix is, and a little extra cheese more than makes up for any missing shortening.
If you have some biscuit mix in the cupboard, by all means use it, but otherwise I see no need to go out and buy a box. If you don�t have self-rising flour, I�ve given instructions below for how to make your own. I really hope you give these sausage cheese balls a try soon. Enjoy!
Makes about 48 sausage cheese balls:
1 1/4 pounds raw hot Italian pork sausage meat (just remove the casing from uncooked, link-style sausages)
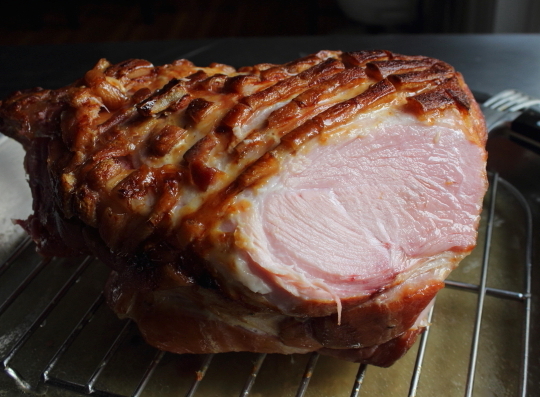
There are many reasons for making your own holiday ham, but the best one of all, may be the most superficial. After the holidays, as people are standing around the water cooler, bragging how great their glazed carrots were, or how amazing the cranberry sauce came out, you can say, �That sounds great, but did anyone else cure their own ham? I didn�t think so.�
Above and beyond establishing your culinary dominance with friends, the other reasons are pretty good too. You can flavor your ham any way you want; you can somewhat control the salt content; and depending on how many people you need to feed, can cure any size cut of pork you want, from a whole leg to a small loin roast.
There are thousands of different brine and spice combinations, but the procedure is pretty much the same no matter which way you go. However, there is one thing all these recipes have in common, pink salt. To make a true ham, you�re going to need a curing salt that contains sodium nitrite, which is what gives the meat its pink color, and signature �ham� taste, verses something that just tastes like roast pork.
This magical ingredient goes by several names, including Pink Curing Salt #, Insta Cure #1, or the one I used, Prague Powder #1. Yes, you can theoretically use things like celery juice, but long story short, nitrites are nitrites, and it doesn�t matter where they come from. For more info on that, and potential health issues, this article by Michael Ruhlman is a good read.
Once the ham is cured, you�ll want to give it a soak to rinse off the brine, and how long you do this can effect how salty your meat is. I prefer just a quick dunk, but you can leave it for as long as 24 hours, which will produce what I�ll call a low-sodium ham. It�s still pink, and flavorful, but barely salty. Experimentation is the only way to figure out how long to you should go, but I wanted to give you the range.
If you do want a home-cured ham gracing your Christmas table, I�ve given you just enough time to get it done. A local butcher should be happy to give you a few tablespoons of pink salt, otherwise it�s quite easy to find online. Whether it�s for a holiday dinner or not, I really hope you give this a try. Enjoy!
Ingredients:
7 to 10 pound fresh, bone-in pork shoulder �picnic� arm roast (or any large hunk of pork)
18 ounces kosher salt (this is about 2 1/4 cups Morton's Kosher Salt, or 3 2/3 cups Diamond Crystal Kosher Salt, as they have difference size grains)
2 cups brown sugar
2 tablespoons plus 1 teaspoon pink salt #1
1 rounded tbsp pickling spice, or any spices you want
For the optional glaze: 1/4 cup Dijon mustard 1/4 cup maple syrup pinch of cayenne pinch of salt
- Once cured, you should smoke and/or roast your ham until it reaches an internal temp of at least 145-150 F. - For a more detailed video on how I prep a ham for the oven, check out this Crispy Honey-Glazed Ham video.
One of the most common mistakes people make when serving cheese, is not letting it come to room temperature first, so that all the flavors can be fully realized. This beautiful, baked stuffed brie takes that principle to the next level.
I went with a festive, and seasonally appropriate filling of cranberries and walnuts, but I�ve done this with at least a dozen different fillings, so don't be afraid to play around.
Believe it or not, Michele and I once had a frozen stuffed brie business for a brief time, and supplied them to some of San Francisco�s finest shops. The business was called, �A Better Brie,� and while we moved on to bigger and better things, we had a lot of fun doing them, and they were very well received. Candied pecan was our best seller, with caramelized mushrooms coming in a close second.
What you seen here is exactly how we used to put them together, so if you weren�t around these parts in the early 90�s, here�s your chance to taste what you missed. I really hope you give this baked stuffed brie a try soon. Enjoy!
Ingredients:
1 small wheel of brie (about 6 to 8 inches is perfect)
handful of dried cranberries, chopped
handful of chopped walnuts
enough puff pastry to cover (1/8-inch thick), plus extra for design
1 egg, beaten with 1 teaspoon water
-- Freeze for 1 hour, bake at 425F. for 20 minutes, or until the pastry is browned, and the brie is soft.
*By the way, do not skip the freezing for one hour step. The crust needs to bake to a golden brown before the brie starts pouring out, so it must be partially frozen when it goes in the oven. If you happen to make it ahead of time, and put it in the oven frozen solid, then I�d lower the temp to 400, and give it an extra 10 minutes or so, or until the cheese is runny.
As the old joke goes, these Russian tea cakes might not be Russian, but at least they�re not cakes. No one knows exactly how these came to be known as Russian tea cakes, but nevertheless, they are quite delicious, very simple to make, and visually ideal for holiday entertaining.
And when I say �easy,� I mean really easy. You dump everything in a bowl, and mix it with your hands until combined. Professional pastry chefs will lose their minds, since we�re forgoing their precious �cream the butter and sugar� step, but the final product is identical, no matter which technique you use.
The only tricky thing here is the baking time, since there are so many variables. Things like the size of the dough balls, whether you use a silpat or parchment, how light or dark the sheet pan is, etc., can all effect the final time significantly.
I think this cookie tends to get under-cooked, and some recipes call for as little as 12 minutes at 350 F. I like these fairly golden, so I get that nice brown-butter flavor, and that took me about 20 minutes or so, which is why I gave such a wide range. Start checking at 15 minutes, and proceed from there.
Thanks to their snowy appearance, these �cakes� would be perfect for your holiday dessert spread, don�t feel like you have to wait for a wedding, or for some Russians to come over for tea. I really hope you give these a try soon. Enjoy!
Makes about 28 to 32 Russian Tea Cakes:
1 cup (2 sticks) room temperature unsalted butter
1/3 packed cup powdered sugar (plus much more to coat finished cookies)
1 cup finely chopped walnuts (very lightly toast nuts in dry pan first for best results)
1/8 teaspoon salt
1 teaspoon vanilla extract
2 cups plus 2 tablespoons all-purpose flour
- Roll into just slightly larger than 1-inch balls, bake at 350 F. for 15 to 25 minutes, or until lightly golden
Yes, if you asked me right now, this salted caramel custard would be my favorite dessert. These easy �pots de cr�mes� are just sweet enough, just salty enough, and just drop-dead gorgeous enough.
I used Maldon sea salt to garnish, which has quite large, but very light crystals, so we�re not adding as much salt as it may appear. Think of a big, fluffy snowflake, floating down onto your warm palm. Stay with me here. As soon as that huge flake lands, it melts into a tiny drop of water. It�s sort of the same thing here.
This recipe will make exactly six (6.5 ounce) ramekins, but you can use any size you want, as long as you monitor the cooking time. Speaking of which, there are many variables effecting how long yours will take, such as ramekin size/shape, and how close they�re packed together, so the times given here are just a guideline.
Simply bake until the custard is just set, and you get that signature �jiggle� when you wiggle. By the way, I wasn�t kidding about eating these cold. I know it�s very hard not to eat a little bit before they�re chilled, but these are so vastly superior in taste and texture when cold, we�re going to need you to be strong. I really hope you give these a try soon. Enjoy!
Ingredients for six (6.5 ounce) ramekins:
9 large egg yolks
2/3 cup white sugar
2 cups heavy cream
1/2 teaspoon kosher salt (or 1/4 teaspoon fine salt)
2 teaspoons vanilla extract
1 cup whole milk
flaky sea salt to garnish
- Bake at 300 F. about 45 min to an hour, or until set.
Crepinettes are probably my favorite type of sausage, both to make and eat, and that�s all thanks to caul fat; one of the culinary worlds most interesting and useful ingredients. Unfortunately, it�s also one of the most bizarre looking ingredients, and that does scare some people off, which is nothing short of tragic.
The food Gods always reward bravery, and here your prize will be a very moist, and extremely flavorful sausage patty, surrounded by a casing that literally melts into the meat.By the way, things like meatloaf, or even whole roasts, can also benefit greatly by being wrapped up in this magical membrane.
As I recommended in the video, be sure to get coarse ground pork from your butcher. The stuff in the meat case is ground too fine, and also probably too lean. I would say a fat content of about 25 to 30% would be ideal here. And yes, of course other ground meats will work using this same technique.
The same butcher you get the pork from should also be able to hook you up with caul fat, but if for whatever reason they can�t, it�s easy to find online. I think it�s well worth the effort, as anyone who has enjoyed these can attest. I really do hope you give this a try soon.Enjoy!
Ingredients for 4 Crepinettes:
1 1/2 pound coarse ground pork (about 25% fat)
2 teaspoons kosher salt
1 teaspoon black pepper
pinch of cayenne
1/4 cup chopped pistachio
2 tablespoons diced dried apricot
1 rounded teaspoon very finely sliced fresh sage leaves
1/2 pound caul fat (this will be enough for probably 8 crepinettes, with extra to spare)